Thursday 27 November 2014

Art Journal Page and my Entry for the Art Journey November Challenge - Theme = Fantasy


Just thought I'd share with you my Entry for the November Challenge by Art Journey.
The theme this month was "Fantasy" and had to include Art Journey Stamps.
The stamps I chose came from the Silhouette2 set which has some interesting images.


I have used two of the images and this is the Art Journal page I made:-

My vision for the Fantasy aspect was a woman closing her eyes on her troubles to dream that she is being carried away to another calmer land.
I used Masking Fluid to create cloud areas and to act as a resist, then made a water colour wash to create the sky. There are touches of Picked Raspberry Distress ink watered down and blended in for a sky at sunset and I also used Distress Ink in Faded Jeans around the edges to simulate night drawing in. Once dried I rubbed off the Masking Fluid. I stamped and embossed my main images with Wow Black Twinkle Embossing powder. I used a tree stamp by Tattered Angels and the flock of birds was a stamp by Tim Holtz. I lightly coloured the trees with Spectrum Noir pencils. Printed my quote on my computer and adhered it with Matte Gel Medium. To finish I've matted and layered my piece first onto white card and then onto black.


                   Below is a short You Tube video where I talk through my creation process.


If you are interested in participating in the challenge click here: http://artjourneydesign-team.blogspot.nl/p/challenge.html

And if you would like to buy Art Journey Stamps  (They ship world wide) click here:- http://www.artjourney.nl/3220--art-journey-stamps

Sunday 23 November 2014

My ATC Swap With  Claudene - MsKayKrafts on YouTube


I've just finished making 6 ATC cards for a swap with Claudene who is MsKayKrafts on YouTube.
They could be on any theme we chose so here are mine.

I made the first one using the Punky Flower stamp set by chocolate baroque. the background is acrylic paint stenciled over with  Viva Decor pearl modeling paste through the Crafter's Workshop Mini Cell theory stencil. I used a silver paint pen on some of the larger spots in the design for a more metallic feel and added a rectangle of Dry Wall Tape mesh over the top. I stamped,  painted and cut out the flower images and positioned them raised up with foam tape. i glossy accented the light bulbs and added small watch/clock parts to various parts of the flowers and for the filaments in the light bulbs. I also added metal rods over the stems and under my sentiment. The metal butterfly was originally bronze so I used Inka Gold in Silver to change it. I adhered blue rhinestones into the empty sections withing the metal piece. 

The second one is made using Duct Tape in two designs. A zippe die-cut by Mariane's Creatables and a few beads strung onto metal and made into a flower with some mesh bling.

The third is using background paper from Marian Smith Designs, Pink lace, Pearl bead trim and a die-cut bird cage by Memory Box. I added a flower from my stash, Leaves from Wild Orchid Crafts and a bird that I'd purchased on ETSY quite a while ago. I printed the sentiment on my computer and added adhesive pearls to the top and bottom of the cage, As a finishing touch I rubbed glitter gel onto the petals of the flower and the wings and tail of the bird and aged the edges with Vintage Photo Distress Ink..

For the fourth I made a tiny shadow box and backed it with a Parisian Advert. Inside I placed an Eiffel Tower metal charm and a small flower arrangement. The front was primed with Gesso then embossed with Viva Decor Pearl Modeling paste through the Tim Holtz Baroque stencil. I then sprayed it several times with Lindy's Stamp Gang spray in Pink Cotton candy. I added two carnations, some tiny rose buds and a couple of  tiny rhinestones.

I like to make a British themed ATC when I'm making them for overseas friends.
 This ATC was to celebrating the Ceramic Poppy Art display that was at the Tower of London  this year to commemorate 100 years since the start of World War 1 and all of the British and Commonwealth soldiers who lost their lives.
I added my personal Remembrance poppy and an image of several London icons. On the back  there is an envelope containing some photo's that i took of the ceramic poppies on a recent visit and a print out explaining the event which was extremely moving.. 

The last card was made using a stamp set by Docrafts and is a paper shirt, tie & jacket. I left the front edge of the jacket unglued so I could curl it back slightly to give some dimension and to make the jacket appear as if it was open.

I really enjoyed participating in this swap and I hope Claudene likes the ATC's when they arrive.

Sunday 9 November 2014


A ROLADEX ART CARD FOR LINDA LAPOTKA


My friend Linda Lapotka on YouTube has been making art on Rolodex cards since the beginning of the year and now she's over 300 days into it without missing a day and hopes to continue until the end of the year.

I thought it would be nice to send her a creation of mine that she can either add to her collection or start a new collection with efforts of friends. I know Martina Huppertova is also sending her one.

If you'd also like to join in. Why not send Linda a message through YouTube.

I painted the background with Black Gesso then used Imagination Craft's Sparkle Medium in Blue Sapphire and Old Rose through a home made flower stencil. I doodled  the stems and leaves with a Gelly Roll Midnight pen in green and then added white Gelly Roll pen to highlight the leaves and to add dots around the stems. I also doodled a border and around the sentiment with a pink Gelly Roll Midnight pen. These pens stand out particularly well on a black background. I punched some small yellow flowers and adhered them into the centre of the large flowers and added a pink dot into their centres. Simple but effective and that Sparkle Gel is really so loaded with glitter it's amazing. and one of my favourite products.

Below is a short video of it's creation.


Friday 31 October 2014

ALTERED BOX


I had a gift to send to a friend so decided to alter a box to send with it . I wanted it to be pretty but at the same time grungy if that makes sense to you. I also wanted to experiment with some new supplies.


I was very happy with the outcome and below I explain more of the process and the supplies I've used.

The box was originally brown kraft coloured so the first thing I did was painted it inside and out with white Gesso.
Once dry, I stenciled on the lid with a baroque design using white modeling paste. On the sides of the box and the bottom I stenciled through the "Art Is" stencil by Crafters Workshop. This was left over night to dry out completely.

For the colour, firstly I used Delphinium Turqoise Starburst Spray by Lindy's Stamp Gang but rather than spraying I applied it with a brush for more control. While still wet, I  carefully sprinkled on a minute amount of Bister in Blue in various places and encouraged this to run around the stenciling with a brush. (Available from Art Journey.nl).This gave a fantastic effect with the shiny turquoise interleaved with the darker blue/black of the Bister. (Remember a tiny amount goes a very long way and the colour is very intense).

I dried everything then used Inka Gold wax paste in Steel Blue and Silver to add areas of extra sheen and to highlight the stenciling. (You need to buff it with a dry cloth to really bring out the shine).

I mixed some clear glass micro beads with some Gel Medium and some of the Lindy's stamp gang spray in a small pot and added it to the box lid in random places. This added extra texture and interest.

For decoration I added Cheese Cloth, silver leaves and white flowers which I'd painted the centers blue to co-ordinate.

The inside of the box was lined with a paper napkin which had a lovely sentiment.


As it was her birthday I included a card which I cut with my ScanNcut machine after making the design in their Canvas Software programme.

ScanNcut have included a new feature update into Canvas, where you can now add a dotted score line to your cuts. This can also be designated as a draw line so I was able to replace my blade with one of their special pens and create faux stitching around my patterned paper. Super fun and a very useful addition. So pat on the head to ScanNcut.

I hope you like my box and below is a YouTube video showing me creating this step-by-step.


Tuesday 28 October 2014

Die-Namites Dies October Challenge


Die-namites Dies are holding a monthly sketch challenge to win a $25 gift certificate and this is my entry.

The challenge was to make a card using a sketch posted on their blog as a guideline. The requirement was to incorporate at least one of their dies and some burlap.

I chose to use the Daisy Bunch Die DN-1012 which I die-cut in black card to be a silhouette. (I have cut off and moved one of the daisies from the bottom into a higher position).


As well as burlap, the sketch also had a strip of lace, so I used black for this too, to tie in with the die-cut. My matting layers were also black.

 As my strip of burlap was a mustard colour I chose a similar shade of mustard for the background paper. I used the Tim Holtz Mini Baroque die for my center mat and cut the black matting layer by hand. The lettering was cut with my ScanNcut machine. To finish I added a few black sequins and filled in the daisy centers with Black Pearl Pen by Viva Decor..


I really like the quality of the Die-namites dies and they cut very well. They have  a good selection of patterns to choose from.

If you'd like to enter the challenge you have a few days left to post your entry.  http://www.die-namitesblog.com/  If not there's always next month.

Thursday 21 August 2014

Art Journey Blog Challenge


The Dutch craft company and rubber stamp manufacturer Art Journey hold a challenge every month and for August the theme is The Sun. At the end of the month one random entrant is picked to win a 10 Euro gift certificate to shop at Art Journey. The requirement is to follow the set theme and use mostly Art Journey stamps. Here is a link to the challenge if you'd like to join in:-
 http://artjourneydesign-team.blogspot.nl/2014/08/challenge-48-zonsun.html

I decided to create an Art Journal page and the Art Journey stamp sets I've used are Nature Flowers and Ripple small. They are very good quality red rubber stamps and Art Journey will ship worldwide.

I first stamped and embossed the flowers with white embossing powder. I then coloured the right hand corner of the page with Squeezed Lemonade Distress Ink. I stamped and embossed over this with clear embossing powder and then blended over this again with Spiced Marmalade Distress ink and graduated this colour into the yellow ink previously applied. As you will see the embossed sun acted as a resist and the yellow still shows through from underneath.

Next I added Tumbled Glass Distress Ink to the sky area and Mowed Lawn & Peeled Paint Distress Ink to the lower portion of the page. Using a cross hatch stamp by Jofy I added lightly stamped texture to the sky with colorbox inks in white and dark orange. To make the piece pop I over-stamped the flowers in Black Archival Ink by Ranger.

 To finish I found a quote about the sun on the internet which I though fitted my page well and printed it out. I cut the quote into strips, used Vintage Photo Distress ink around the edges and used Claudine Hellmuth Matt Medium to glue them into place. I used black alcohol marker pen to accentuate the edge of the page then matted and layered it onto blue and then black card ready to be adhered into my Art Journal..


Wednesday 20 August 2014

ATC SWAP WITH VELOCITYVETTE08


I was invited to participate in an ATC swap with Jane who is Velocityvette08 on YouTube.
We had to each make 5 different ATC's which could be on any theme.
These are the 5 designs I came up with:-

The first one is a nice jokey card made using a Magazine Freebie Rubber Stamp by Acid Drops & What Nots. I stamped the design several times and then cut out several sections of each stamp to compose a decoupage of the bow on the swimming costume and  the hat. The background was painted with acrylic paint over Gesso. I added glitter to the wet paint for the sand and a Tim Holtz stamp for the birds. To finish it off I added a bit of rhinestone bling with a dolphin and some starfish. I then edged the piece with gold paint pen.

For my second piece I used Dreamweaver Crackle Paste through the Crafters Workshop Mini Cell Theory stencil. Once dry I dripped on Green, Blue, & Black Liquitex acrylic Ink and allowed it to flow into all of the cracks. On top of this I rubbed gold Inka Gold to pick out the high points and add some shine. The beetle is from a stamp set by Chocolate Baroque called Steampunkery. I painted it with alcohol markers and Lumiere paint in Halo Green Gold then added Ranger's Glossy Accents to the clock face and the beetles shell. I adhered this piece with foam tape for dimension and slightly curled up the edges of the wings. 

As I'm English I went patriotic for this card. I used the bus stamp from the DoCrafts Portabello Road set. I used a Union Jack flag napkin for the background and two ribbons from the set. I printed out a tiny London scene and fussy cut it around the edges. Because the design was too intricate to cut it all out, I coloured inside the design with alcohol marker pens to blend into the napkin design. I added flag design buttons for the headlights of the bus and Ranger's Glossy Accents to make the red paint shine. I then added a London Button to finish it off.

This ATC was fun to make and to have a little messy play. I used the stamp set by  the Dutch company Art Journey and fussy cut out all the pieces I wanted to use. For the paint colours I actually used melted wax crayon and allowed it to run down the card. I melted one colour at a time matching each line up with a stamped paintbrush. It's a very tactile card with a lovely feel to it..

For my last card I used the Punky Flowers stamp set by Chocolate Baroque onto a background of Acrylic Paint which was stamped with script and spattered with black Liquitex Ink. The poppies were stamped onto glossy card, coloured with alcohol ink markers and silver paint pen. I covered the light bulbs with Anita's 3-D Clear Gloss Finish and added my sentiment with Matt Medium. I drew a shadow around each poppy with a gray marker pen and added highlights to the bulbs with a white Faber Castelle PITT pen.

I was really happy with how they all turned out and I hope Jane likes them too.

Tuesday 12 August 2014

Art Journal Page - "Shining Souls"


This Art Journal page is inspired by the 100 year Anniversary of the beginning of WW1 which is being commemorated throughout Europe.

I used two of the stamps from a set by Chocolate Baroque called Punky Flowers. I stamped onto light weight card several times and then coloured the flowers with Inktense Blocks used as water colours. Once dried, I fussy cut out each flower and covered the light bulbs with glossy accents to look like glass. I used a black Faber Castell Pitt pen to re-enhance all the stamp lines and a silver gel pen to colour the metal elements at the bottom of the light bulbs and the bottoms of each flower. The stems and leaves were painted with two different shades of green.

The background was a piece of light weight chipboard which I first painted with white Gesso and then a coat of Paper Artsy Fresco Finish Paint in Beach Hut. Using a script stamp and Aquamarine Archival Ink by Ranger I stamped across the entire image. On top of this I then used white colorbox ink and a cross hatch stamp by Jofy randomly to create visual texture.

The flowers were glued into place using Claudene Helmuth Matt Medium. Some were cut apart and slotted behind other flowers to achieve the layout design I was looking for. I added some alcohol ink pen around the bulbs in yellow and then went over this again with a wash of yellowInktense block to add a glow. I added white highlights to each bulb then outlined each flower with a dark grey Spectrum Noir marker pen . The sentiment was typed and printed on my computer. Cut apart and adhered into place with Matt Medium. I then added the small white plaque to explain the meaning of the piece.  I matted the page onto yellow, then black card.


I created a step-by-step YouTube video of the creation of this page which you can watch below.

Tuesday 22 July 2014

Craft Stamper Magazine July - "Take It Make It Challenge"     


The Embossing Resist Technique.
For this months challenge I've made a card using a large stamp by Hero Arts - Flower Text S5506. I stamped onto white card with clear embossing ink, then used white embossing powder. Once this was cooled I began to ink over the top with Distress Inks. I used Tumbled Glass, Broken China, Stormy Sky and Faded Jeans.
This really made the white embossing pop.

I  dug out my bag of small paper scraps and began to stamp the flowers & leaves onto various colours of paper. I  embossed them with the white embossing powder as before then fussy cut out each individual element of the design and adhered them down with Matt Medium. For a final touch I added some pink rhinestones. The finished front panel was matted onto white card, then navy card then onto the  white card base & voila!
I hope you like it.


Sunday 20 July 2014

Mixed-Media Art Journal Collage
QUEEN


I wanted to do something different with my Art Journal so I thought I would try some collage.
I found a picture I liked in a newspaper and fussy cut it out.
I started the page with a stenciled background using Inka Gold in a mixture of Lava Red and Violet mixed together then some gold through a different stencil.  I toned this down with watered down wash of white Gesso.
Before I glued down my image I added a stamped butterfly wing which I coloured with Derwent Inktense Pencils. I added some shading around the edge of the image and also some doodling. I gave her a crown of chipboard coloured with Inka Gold in Bronze. I wrote my caption aroud the image with a Black Faber Castelle Pitt Pen.

I have a video of the creation process below.


My Video of the creative process

Saturday 21 June 2014

DAY TAGS FOR MARTINA HUPPERTOVA


Martina Huppertova on YouTube was holding a competition challenge (I believe it's closed now) to make Day Tags that she will be including in her weight loss journal. The rules were to create a tag and it had to be a certain size and include 7 text fields. You could only use the colours Pink, Black, White and Silver.She has made over 100 of these tags herself which she documents on her YTChannel
https://www.youtube.com/user/2101JustPerfect/videos but she will be moving house soon and has had to pack up her craft room, so she thought it would be great fun to have some tags made by her subscribers to add to the journal and she will do a prize draw once all the tags have been shown.

The requirement to enter the competition was for just one tag, but I had so much fun creating the first one that I went on and made three.

I love the organic looking background on this tag. (If you want to know how I created it look out for my next YouTube video where I show a step-by-step tutorial). I added seed beads and sequins for more texture and I really didn't want to cover any of it with Text fields. I deliberated for a long time for the best way to add the fields without ruining the effect of the background and then had had the idea of the pretty butterflies.  I then punched a hole, added an eyelet and some of this lovely whispy trim. To finish I edged the tag with pink glitter glue.

For this tag I used two different patterns of Duct tape. The zipper die-cut is by Marianne's Creatables and I used a small circle punch for the text fields which I shaded around the edges with Distress ink. I punched a hole then added an eyelet and fluffy trim.

Again I've used Duct Tape for the background. I die-cut hearts from black card, Heat embossed the edges with silver embossing powder. I added silver glittery glue around the edge of the tag. An eyelet and black trim finished it off.

Thursday 5 June 2014

ART JOURNAL PAGE - "STARS"


A new Mixed-Media Art Journal page I've created today entitled "Stars"
This page is a tribute to all the lovely friends I have made on You Tube who live all over the world.
There is a short YouTube Time lapse video at the end of this post showing the creation of this page.

I first wet the page with water then dropped on some Liquitex Acrylic Ink in Quinacridone Magenta and allowed it to find it's own organic path. I helped it along in places by blowing through a drinking straw to create veins of ink. Once thoroughly dry I splattered randomly on the page with Carbon Black Liquitex Ink.
To give the piece texture I adhered a length of cheese cloth which I pulled about to tatter the edges. On top of this I adhered a length of pink plastic netting (Recycled from some wrapping around fruit) which I also distressed along the edges. I printed my sentiment onto pink card using my P. C. then die cut it into a heart shape. I inked the edges with Picked Raspberry distress ink then used hot glue to stick it on the right side of my page. (If you have any glue spots showing through the textiles you can use these pieces to cover them from view).
I had found a large bag of unusual shaped sequins on one of my shopping sprees and I adhered these on randomly to represent stars and other objects in space. I also added silver rhinestones. Finally I matted the piece onto copy paper that I had coloured the edge with an alcohol ink marker which matched the pink colour on my page. Then matted again onto black card before finally adhering it into my journal.
I was very pleased with the final result. Sometimes you just know when something feels right. 


Here is the video


Tuesday 3 June 2014

BIRTHDAY CARDS FOR MY LOVELY MUM


I've been busy over the last few days making a couple of birthday cards for my lovely mum.
I needed to make two as my daughter asked me to make one for her to give too.

I decided to utilize the help of my Brother ScanNcut cutting machine and these are what I came up with.


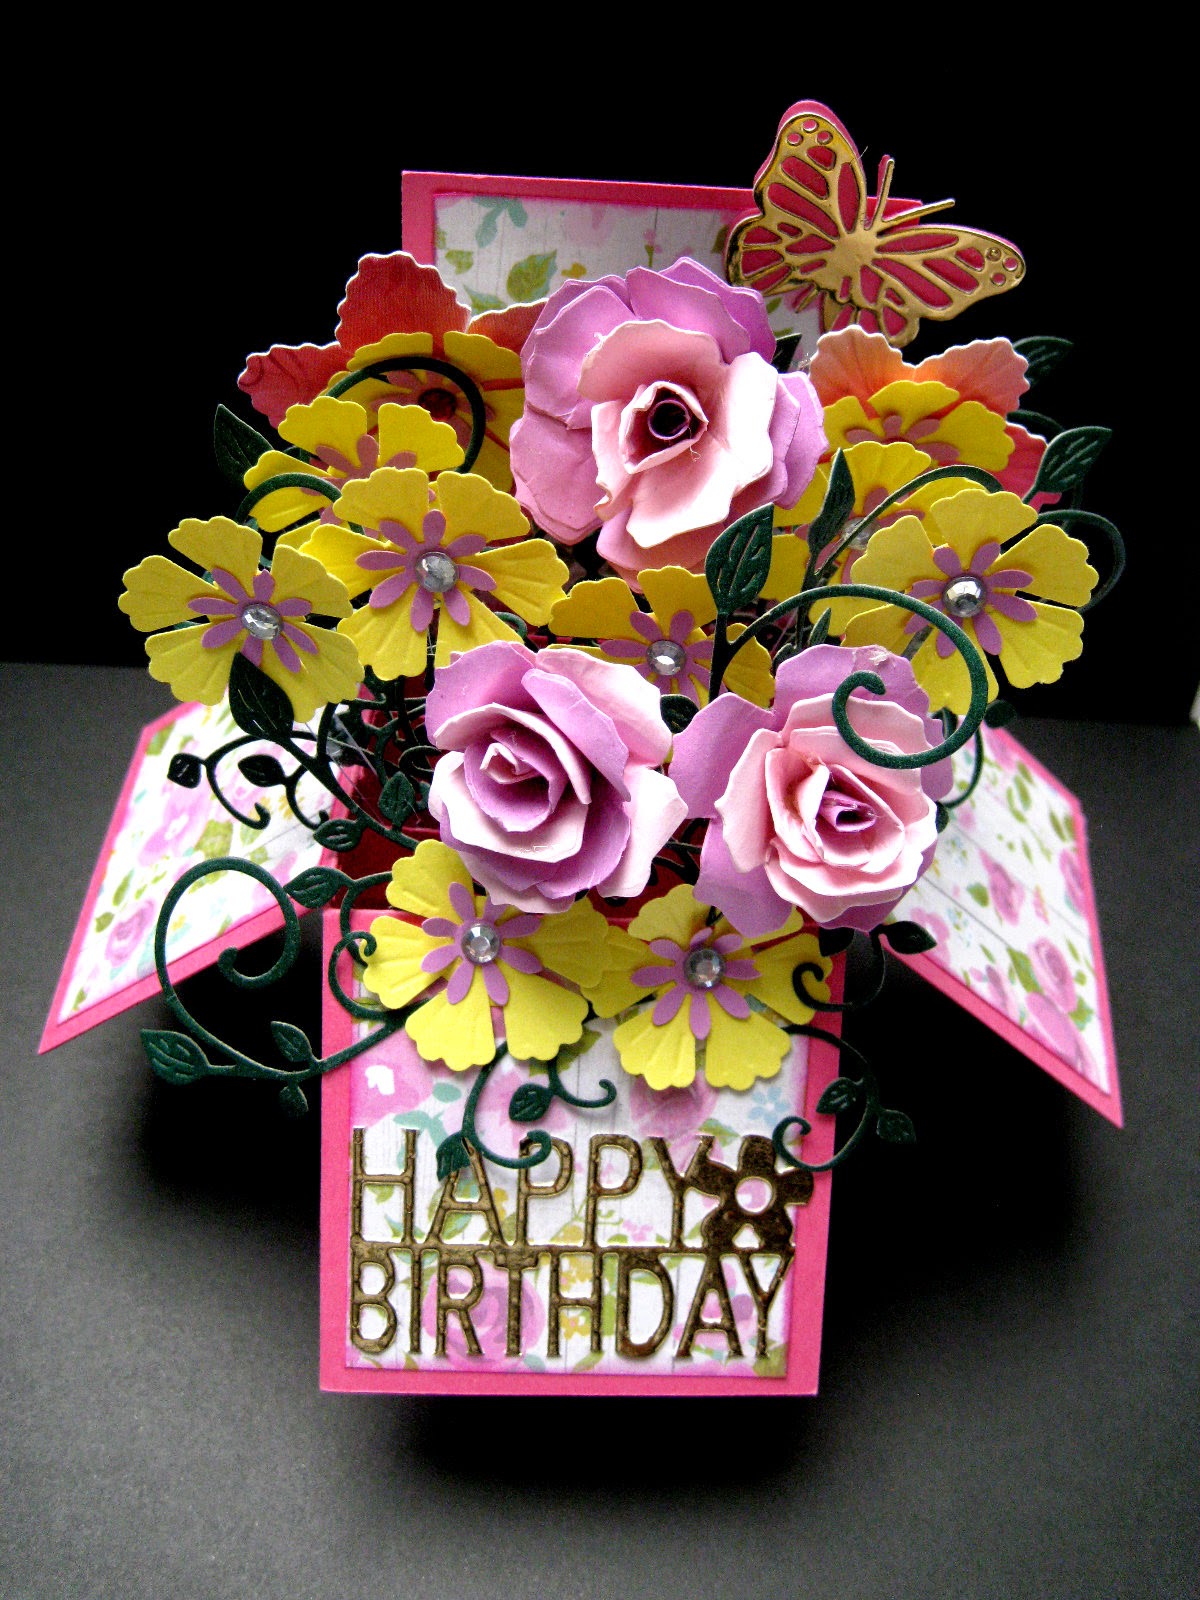
I absolutely love how this card turned out. I used a cut file for the box which was a freebie from applelover53 on YouTube. Once assembled I die-cut and assembled flowers from dies and punches in my stash then adhered them onto thin acitate strips with tacky glue. I then adhered these to the three cardstock ledges that run across the inside of the box. I die-cut lots of green leafy flourishes with a Cheery Lynn die and randomly added these between the flowers.


Here you can see the ledges for mounting the flowers.


The Happy Birthday on the front was die-cut from a free die which came with a magazine. I cut off the frame and just used the internal letters. I then added a Butterfly die-cut from the Diamond-Dies die.
I made my flowers quite dimensional as my box wasn't going in the post. If you want to mail it you would need to create flat flowers. It's an amazing card concept as the whole thing can fold flat to fit in an envelope. I shall definitely be making more of these in the future.  

For the second card I used a free cutting file I found on the internet from a lady called  Bird (http://www.birdscards.com/) to cut out the lattice front of the card. I covered this with glitter glue and once dry I mounted it onto light blue card and then again onto the white card base. I die-cut a small label which I mounted onto light blue card and inked the edges with Broken China Distress Ink before adhering to the center of my card. I used the ScanNcut again to cut out the word "Nana from the same light blue card and added this to the white lable. I die cut a butterfly using a die from Diamond-Dies from Blue Miri card and a silver miri card base. I added silver rhinestones to the center of several of the lattice flowers.

Monday 21 April 2014

EASTER JOY


As it's Easter and we've all got a few days vacation I thought I'd relax and play with my Art Journal.

My lovely mum has recently bought me a Brother ScanNcut machine so I wanted to experiment with it a bit and see what the cuts were like that were included with the machine. This lead me to be inspired to create this whimsical Easter page featuring none other than the "Easter Bunny" himself.

I've used a lot of pastel colours and wanted to create a whimsical dream like piece.
I sprayed the background with Crafty Notions Colour Spray in Blue Lustre, Lindy's Stamp Gang Starburst Sprays in Baby Blue Eyes and Delphinium Turquoise. I then stamped over all the background with Aquamarine Archival Ink on a Kaisercraft Texture Stamp called Hessian. I freehand cut some hills from card and cut a couple of grass borders with my ScanNcut. Using an X-cut die I used up some of my scraps by cutting some Hexagons. I used another die, this time in an oval and cut another shape to be my egg. I painted this with Liquitex Unbleached Titanium and stamped over the surface with Colorbox Cats Eye ink in Creamy Brown using a Shiela Douglas "Ageing Beautiful Crackle stamp from her A Little Bit Sketchy range. I diecut the daisies in white and pink using a Die-namites die called Daisy Bunch DN-1012 and used "Fluffy Stuff" by Woodware in the centre of each flower and puffed it up with a heat gun. I used my ScanNcut again to cut the carrots, clouds, the sun and the Easter Joy lettering.

Once the letters where adhered into place I outlined them with a Stabillo Fine Liner pen in black and added some shadow with a Faber Castelle Big Brush PITT pen in Cold Grey. I then covered each letter with Glitz Glitter Glue in Iridescent Sparkle. I also added a bit of this same glitter glue to the bunny's bow.

I added "Fluffy Stuff" by Woodware to the centre of my sun and also to the centre of each flower as shown below. I then puffed this up using a heat gun. It gives a great effect.


The crackle stamp used on the egg gives a realistic look.

I hope you like my journal page and if you'd like to see me making it you can watch my YouTube video
below which has a Step-by-step walk though at double speed.


Thursday 10 April 2014

MOTHER'S DAY 


On the 30th March in the UK it was Mother's Day and I'd like to share with you a card I made for my lovely Mother. I hope you like it as much as she did.

I folded the front of the card base back on itself and die-cut a half circle into the edge with the fold. I trimmed off half an inch from the other end and then embossed half of the card front up to the fold using a Dots embossing folder. I created a fringe using fringe scissors and adhered this to the underside of the folded card front. I then glued the whole of the folded card flap down onto itself so that it no longer flipped open. I die cut 2 labels, the larger one in the same colour as my flower and layerd one on top of the other. I then stamped and embossed my sentiment. I adhered this to the front of the card and added a gold die-cut butterfly by Die-mond Dies to the edge of the label and placed a gold die-cut corner by Marianne's Creations near the top of the card.

I stamped stems & leaves onto the inside of the card and embossed them with Verdigris embossing powder by Ranger. I then used one of the Papermania Big Blooms as my bottom flower. I stamped and fussy cut several other flower parts which I adhered on top of the large one and then to finish it off, a gold punched flower and a resin center.

I had a couple of die-cut leaf stems which were similar to the stamped image I already added, so I glued those in between the others to give some dimension. I then continued the theme of the front of the card and added another gold die-cut butterfly and two more gold corners. I die-cut another large label but this time in white card and glued it onto the back of the other labels for neatness. It also gave me a place to write my message.

The center resin piece has a basket weave design - Very cute..

Friday 28 March 2014

Abstract Art - Spotlight Technique - Art Journal Page


I've been working in my Art Journal again and I was inspired to try what I call "The Spotlight Technique" which I saw originally in a U-Stream Class given by the lovely and talented Limor Webber.

This technique involves creating a colourful background to which you add various interesting stamped images.

The next part is the hardest and was very much out of my comfort zone as it involves covering a vast amount of your lovely artwork with black acrylic paint.

Take a circular object (I used the inside cardboard tube from  a Kitchen Roll and also a small plastic desert pot) and choose several places in your artwork that you think are the most interesting. Using the circular object as your template, draw around them with the black acrylic paint, brushing outwards and joining several circles together.

This draws your eyes into the spotlighted areas and creates a very interesting effect.

The finished background before adding the black acrylic paint


Interesting areas enclosed by circles of black acrylic paint creating a "Spotlight" effect.


Below is my YouTube video showing the step-by-step completion of this page.

click on the above image to watch